Check + Clair Earned Wage Access Integration Guide
Introduction
Clair provides earned wage access (EWA), letting employees access their earned wages before payday. Unlike payday loans, earned wage access is based on wages an employee has already earned, reducing financial stress while building a more loyal, focused, and dependable workforce.
The Check + Clair integration enables any Check partner to offer Clair's earned wage access product to employees on their payroll platform. Clair handles the advances and employee-facing UX via an embedded SDK, while Check handles repayment automatically through its net pay split infrastructure. Your role as a partner is to authorize the integration and surface the Clair SDK in your app.
How Earned Wage Access Works
When an employee requests an advance through the Clair SDK, Clair underwrites the advance based on the employee's prior period gross earnings and issues funds to the employee's bank account (via free ACH or instant transfer for a fee). On the next payroll cycle, Check automatically routes the repayment amount from the employee's paycheck to Clair's repayment account via a net pay split, then restores the employee's original direct deposit configuration. The employee's experience is seamless — they see the advance deduction on their paystub and their direct deposit returns to normal after repayment.
Implementation Timeline ExpectationsIn order to access our integration with Clair, you must first be introduced to Clair to establish a relationship and receive API credentials directly from Clair. Then you will need to integrate the Clair SDK into your application.
The implementation process will take several weeks to complete.
If interested in using our integration, please reach out to your Check representative to get this process started.
Integration Overview
The Check + Clair integration follows a five-step process:
- Authorize Clair for a company — Use Check's Authorize an Integration Partner API to grant Clair access to company and employee data.
- Register employees with Clair — Use Check's Authorize an Integration Partner for an Employee API to create employee-level consent that allows Clair to access employee data.
- Surface the Clair SDK in your app — Embed the Clair SDK (React Native, iOS, Android, or Web) to provide the employee-facing EWA experience.
- Employee consent and advance — Inside the SDK, Clair handles KYC, consent, account setup, and advance requests. No additional work from you is required.
- Repayment via net pay splits — Clair automatically creates and manages net pay splits through the Check API to route repayment from the employee's next paycheck. No additional work from you is required.
Step 1: Authorize Clair for a Company
When an employer opts to enable earned wage access for their employees, you need to authorize Clair to access that company's data through Check. You can do this in one of two ways: by surfacing Check's Employer Authorization modal (recommended), or by calling the Authorize an Integration Partner API directly.
Option A: Surface the Authorization Modal (Recommended)
Call the following endpoint to display the authorization modal to the employer:
{{apiUrl}}/companies/{{companyId}}/components/integrations/authorize

REQUEST BODY:
{
    "integration_partner": "int_WmZLVsXhpV55lkYjJh7r",
    "integration_permission": "ipe_5Isnnfi5JGbDWLbwU9UZ",
    "email": "[email protected]"
}
The modal confirms that the employer is comfortable sharing necessary data with Clair:
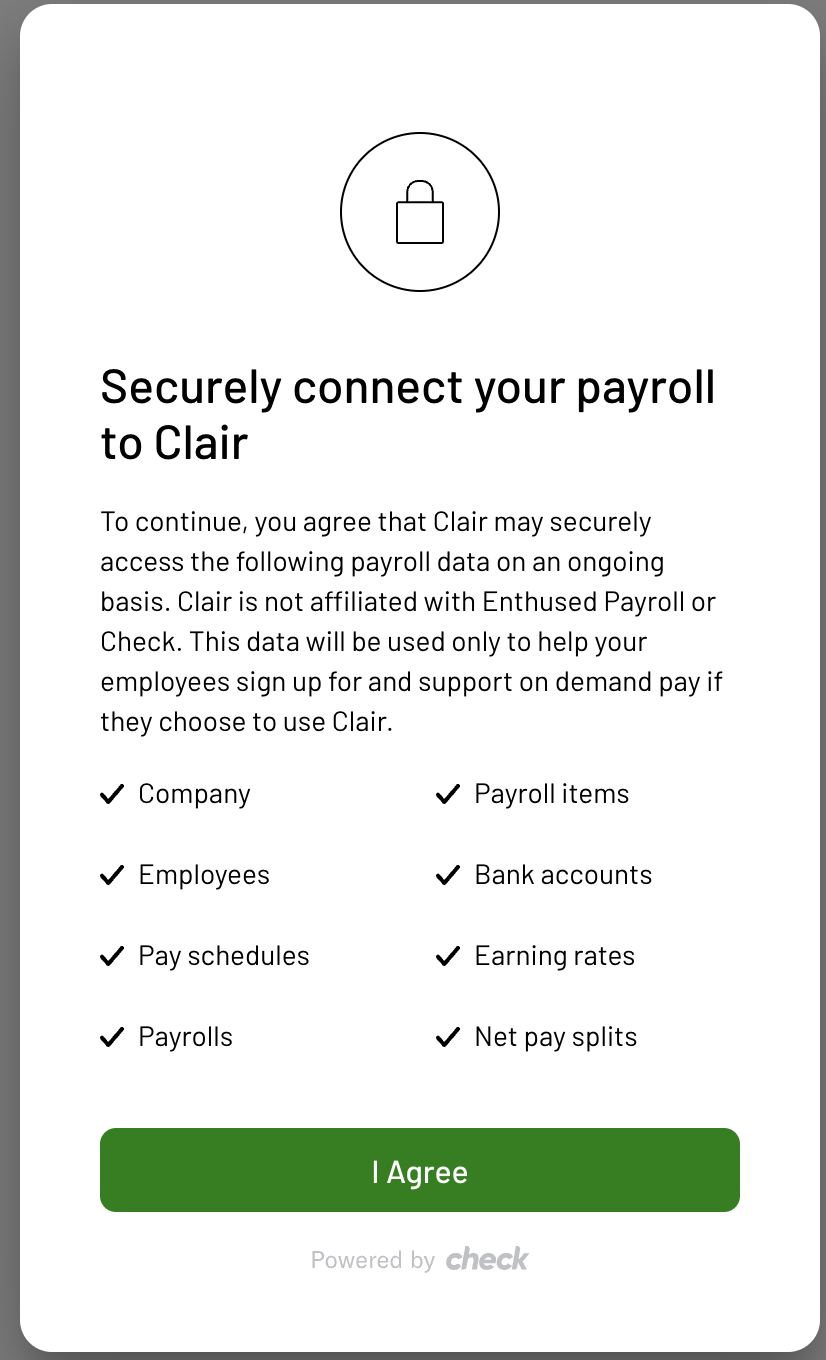
We recommend surfacing this modal when the employer turns on Clair access for their employees.
Option B: Authorize via API
If you prefer to manage the authorization flow and employer consent experience yourself, you can call the Authorize an Integration Partner API endpoint directly instead of rendering the modal:
{{apiUrl}}/integrations/partners/int_WmZLVsXhpV55lkYjJh7r/authorize

REQUEST BODY:
{
    "integration_permission": "ipe_5Isnnfi5JGbDWLbwU9UZ",
    "company": "{{companyId}}"
}
This bypasses the modal UI and authorizes Clair directly. When using this approach, you are responsible for collecting employer consent in your own UI before making the API call.
Check Connection Status
Use the Integration Access API to check whether the authorization is complete:
{{apiUrl}}/integrations/accesses?company={{companyId}}

RESPONSE BODY:
{
    "id": "iac_bJo9O27Y45vZ8JCEUIM6",
    "company": "com_iGtVgB9xuQjU0MlfnpeO",
    "status": "connected",
    "integration_permission": "{{integrationPermissionId}}",
    "access_type": "Integrated",
    "integration_partner": "int_WmZLVsXhpV55lkYjJh7r",
    "scope": [...]
}
When the integration access has a status of connected and an access_type of Integrated, the connection is ready. We recommend displaying this to the employer via a "Connected" status indicator.
You can also use this API to know when to close the authorization modal — when an integration access is created for Clair, the authorization process has started, and you can close the modal.
Integration Permission Reference
| Permission | Description |
|---|---|
Integrated ipe_5Isnnfi5JGbDWLbwU9UZ | Once an employer turns on Clair access for their employees, they will be prompted by the authorization modal to grant Check access to share information with Clair. If they authorize this, the company's access will be updated to Integrated. |
Disconnectedipe_bgwyL20RP5FUTKirFJkp | Once integrated, employers can later opt out of Clair. This is initiated from the partner's platform and sent via the Authorize endpoint. This disables earned wage access for their employees and prevents additional employees from signing up. |
Disconnect Clair for a Company
If an employer opts to disconnect Clair, send the Disconnected permission to Check:
{{apiUrl}}/integrations/partners/{{integrationPartnerId}}/authorize

REQUEST BODY:
{
   "integration_permission": "ipe_bgwyL20RP5FUTKirFJkp",
   "company": "{{companyId}}"
}
You can use the Integration Access API to confirm that Clair is disconnected, and display the updated status to the employer.
Step 2: Register Employees with Clair
After a company is authorized, you need to register individual employees with Clair. This is a two-part process: first, authorize the employee in Check, then activate the employee in Clair's system.
Call Clair's API to activate the employee. This returns a UUID that you'll use to initialize the Clair SDK for that employee.
https://partner.clair.cash/check/activate-employee

REQUEST BODY:
{
    "companyId": "com_sx3svU6K8c5ZkSFlOh5p",
    "employeeId": "emp_zGGp6wYcxAeu1Ng8IA7v"
}
Production URLIn production, use
https://partner.clairpay.io/check/activate-employeeinstead of the sandbox URL.
AuthenticationClair's API uses OAuth 2.0 Client Credentials. Obtain your
client_idandclient_secretfrom Clair, then request a token from the/oauth/tokenendpoint on the same base URL.
Response (200): Returns a UUID string. Use this value to initialize the Clair SDK for the employee.
| Status | Description |
|---|---|
200 | Employee successfully activated. Returns a UUID for SDK initialization. |
403 | Forbidden — your authenticated datasource is not a recognized Check partner in Clair's system. |
404 | Not found — no business matches the given company ID for your partner account. |
422 | Validation error — missing or invalid companyId or employeeId. |
When to Register EmployeesWe recommend registering employees when they first open the Clair experience in your app (i.e., just before booting the Clair SDK). This ensures that only employees who are actively engaging with the EWA feature are registered, rather than bulk-registering all employees upfront.
Step 3: Surface the Clair SDK
After authorizing a company and registering an employee, embed the Clair SDK in your application to provide the employee-facing earned wage access experience.
The Clair SDK is available for:
- React Native (iOS and Android)
- Web (JavaScript)
The SDK handles the entire employee-facing flow, including:
- Data-sharing consent
- KYC (Know Your Customer) verification
- Bank account setup
- Advance requests (free ACH or instant transfer for a fee)
- Balance and repayment status display
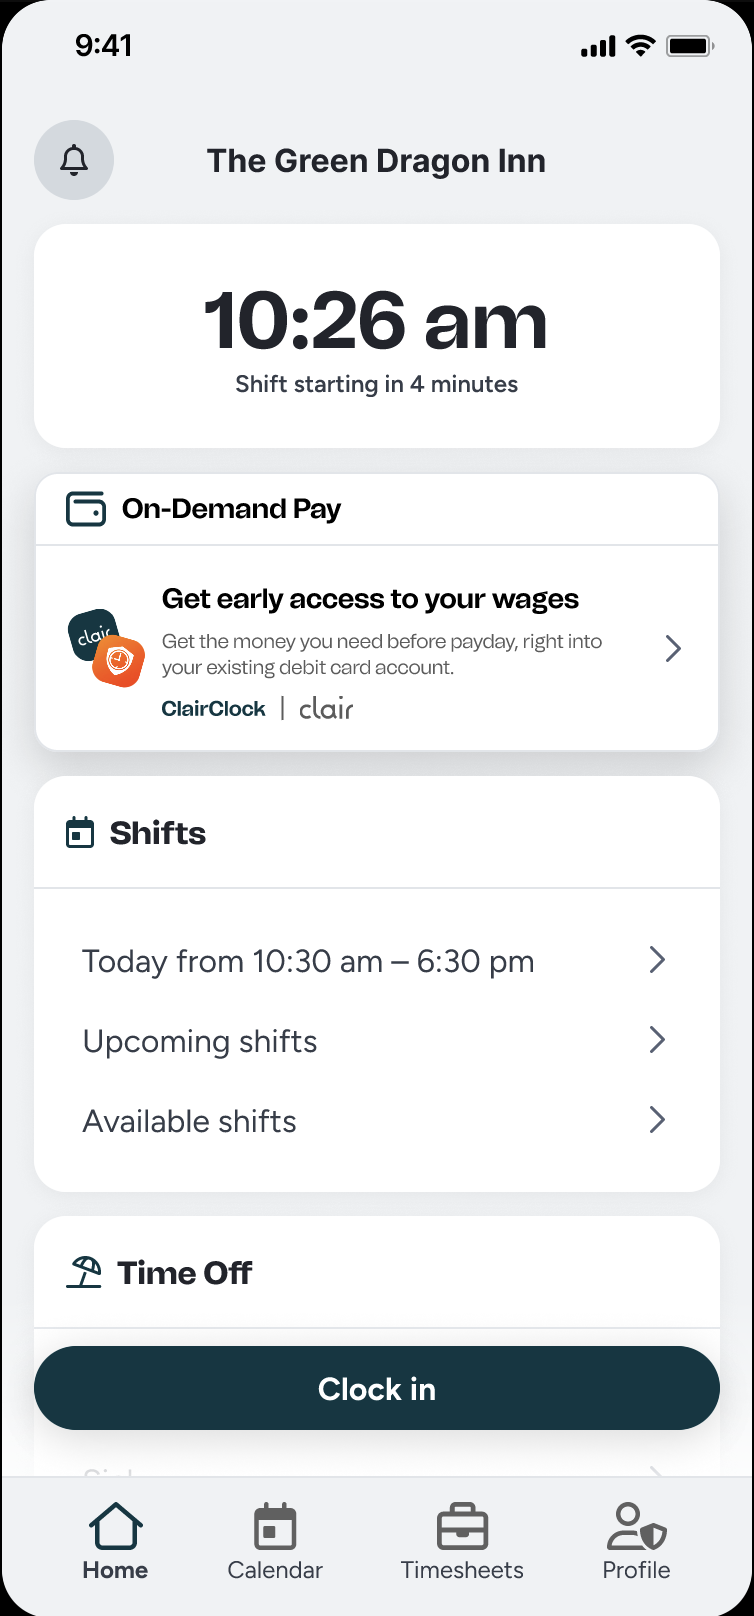
The Clair SDK entrypoint embedded in a generic mobile app.
Clair SDK DocumentationFull documentation on launching the Clair SDK is available through the Clair Partner Portal. Contact your Clair representative to request access. The SDK supports co-branding with your platform's colors and logo.
Where to Surface the SDKWe recommend placing the Clair entry point in your payroll or employee profile section, where employees already go to view paystubs and manage direct deposit settings. Additional high-visibility placements (e.g., home screen banners, post-shift prompts) can drive higher engagement.
What to Expect: Clair Data Modifications
Once the integration is active and employees begin using earned wage access, Clair will make modifications to employee data in Check through its API access. As a partner, you should be aware of these changes and how they affect your platform.
Bank Accounts
When an employee takes their first advance, Clair creates a Pathward bank account on the employee in Check. This account is used as the repayment destination for advance repayments.
- The Pathward account will appear in the employee's bank account list alongside their personal accounts.
- This account is managed by Clair and should not be edited or deleted by your platform.
- The account persists on the employee even after repayment, so it can be reused for future advances.
Identifying Clair-Owned Bank Accounts
Bank accounts created by Clair will have a source field set to int_WmZLVsXhpV55lkYjJh7r (the Clair integration partner ID). You can use this field to identify Clair-managed accounts in your UI and prevent employees or employers from editing or deleting them.
UX RecommendationUse the
sourcefield to distinguish Clair-created bank accounts in your UI. For example, you might display the Pathward account with a "Clair — Earned Wage Access" label or hide it from employee self-service direct deposit management.
Console and Onboard
Check's Console and Onboard products both reflect when a bank account is owned by Clair. Clair-managed bank accounts are displayed as read-only and cannot be edited or deleted through these interfaces.
Onboard
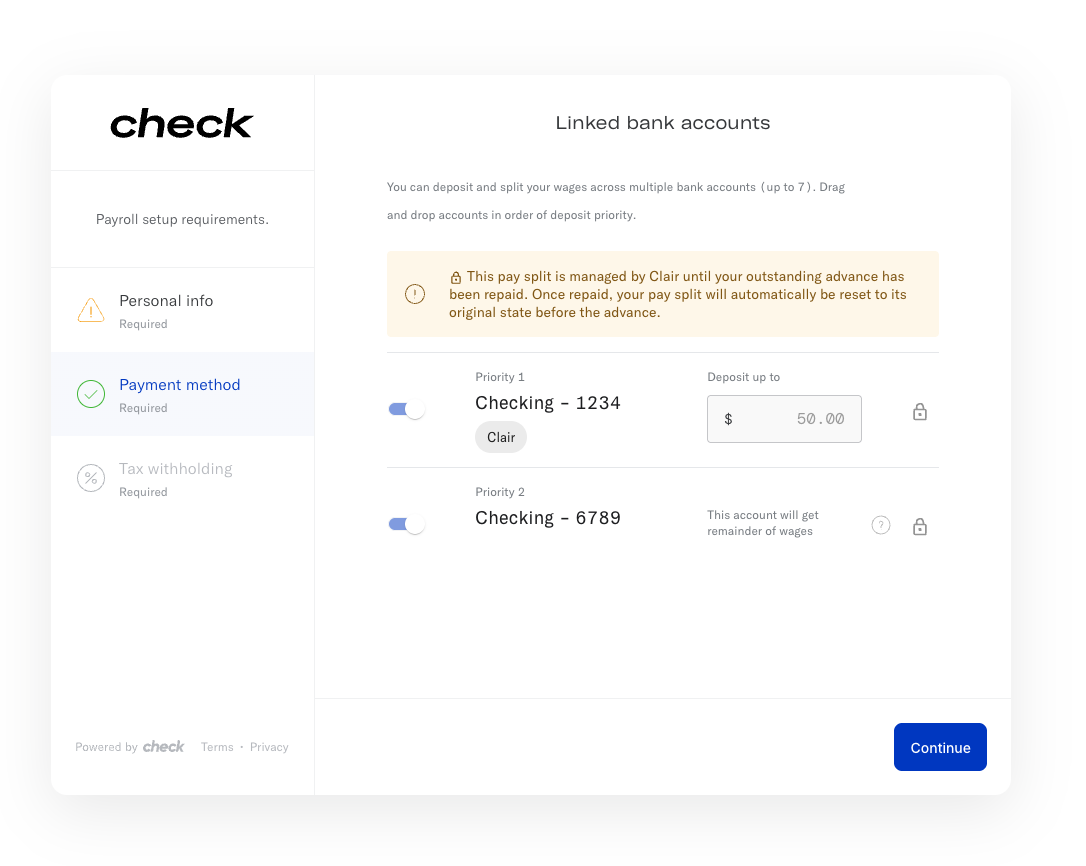
Employee Onboard representation of a Clair-owned net pay split.
Console
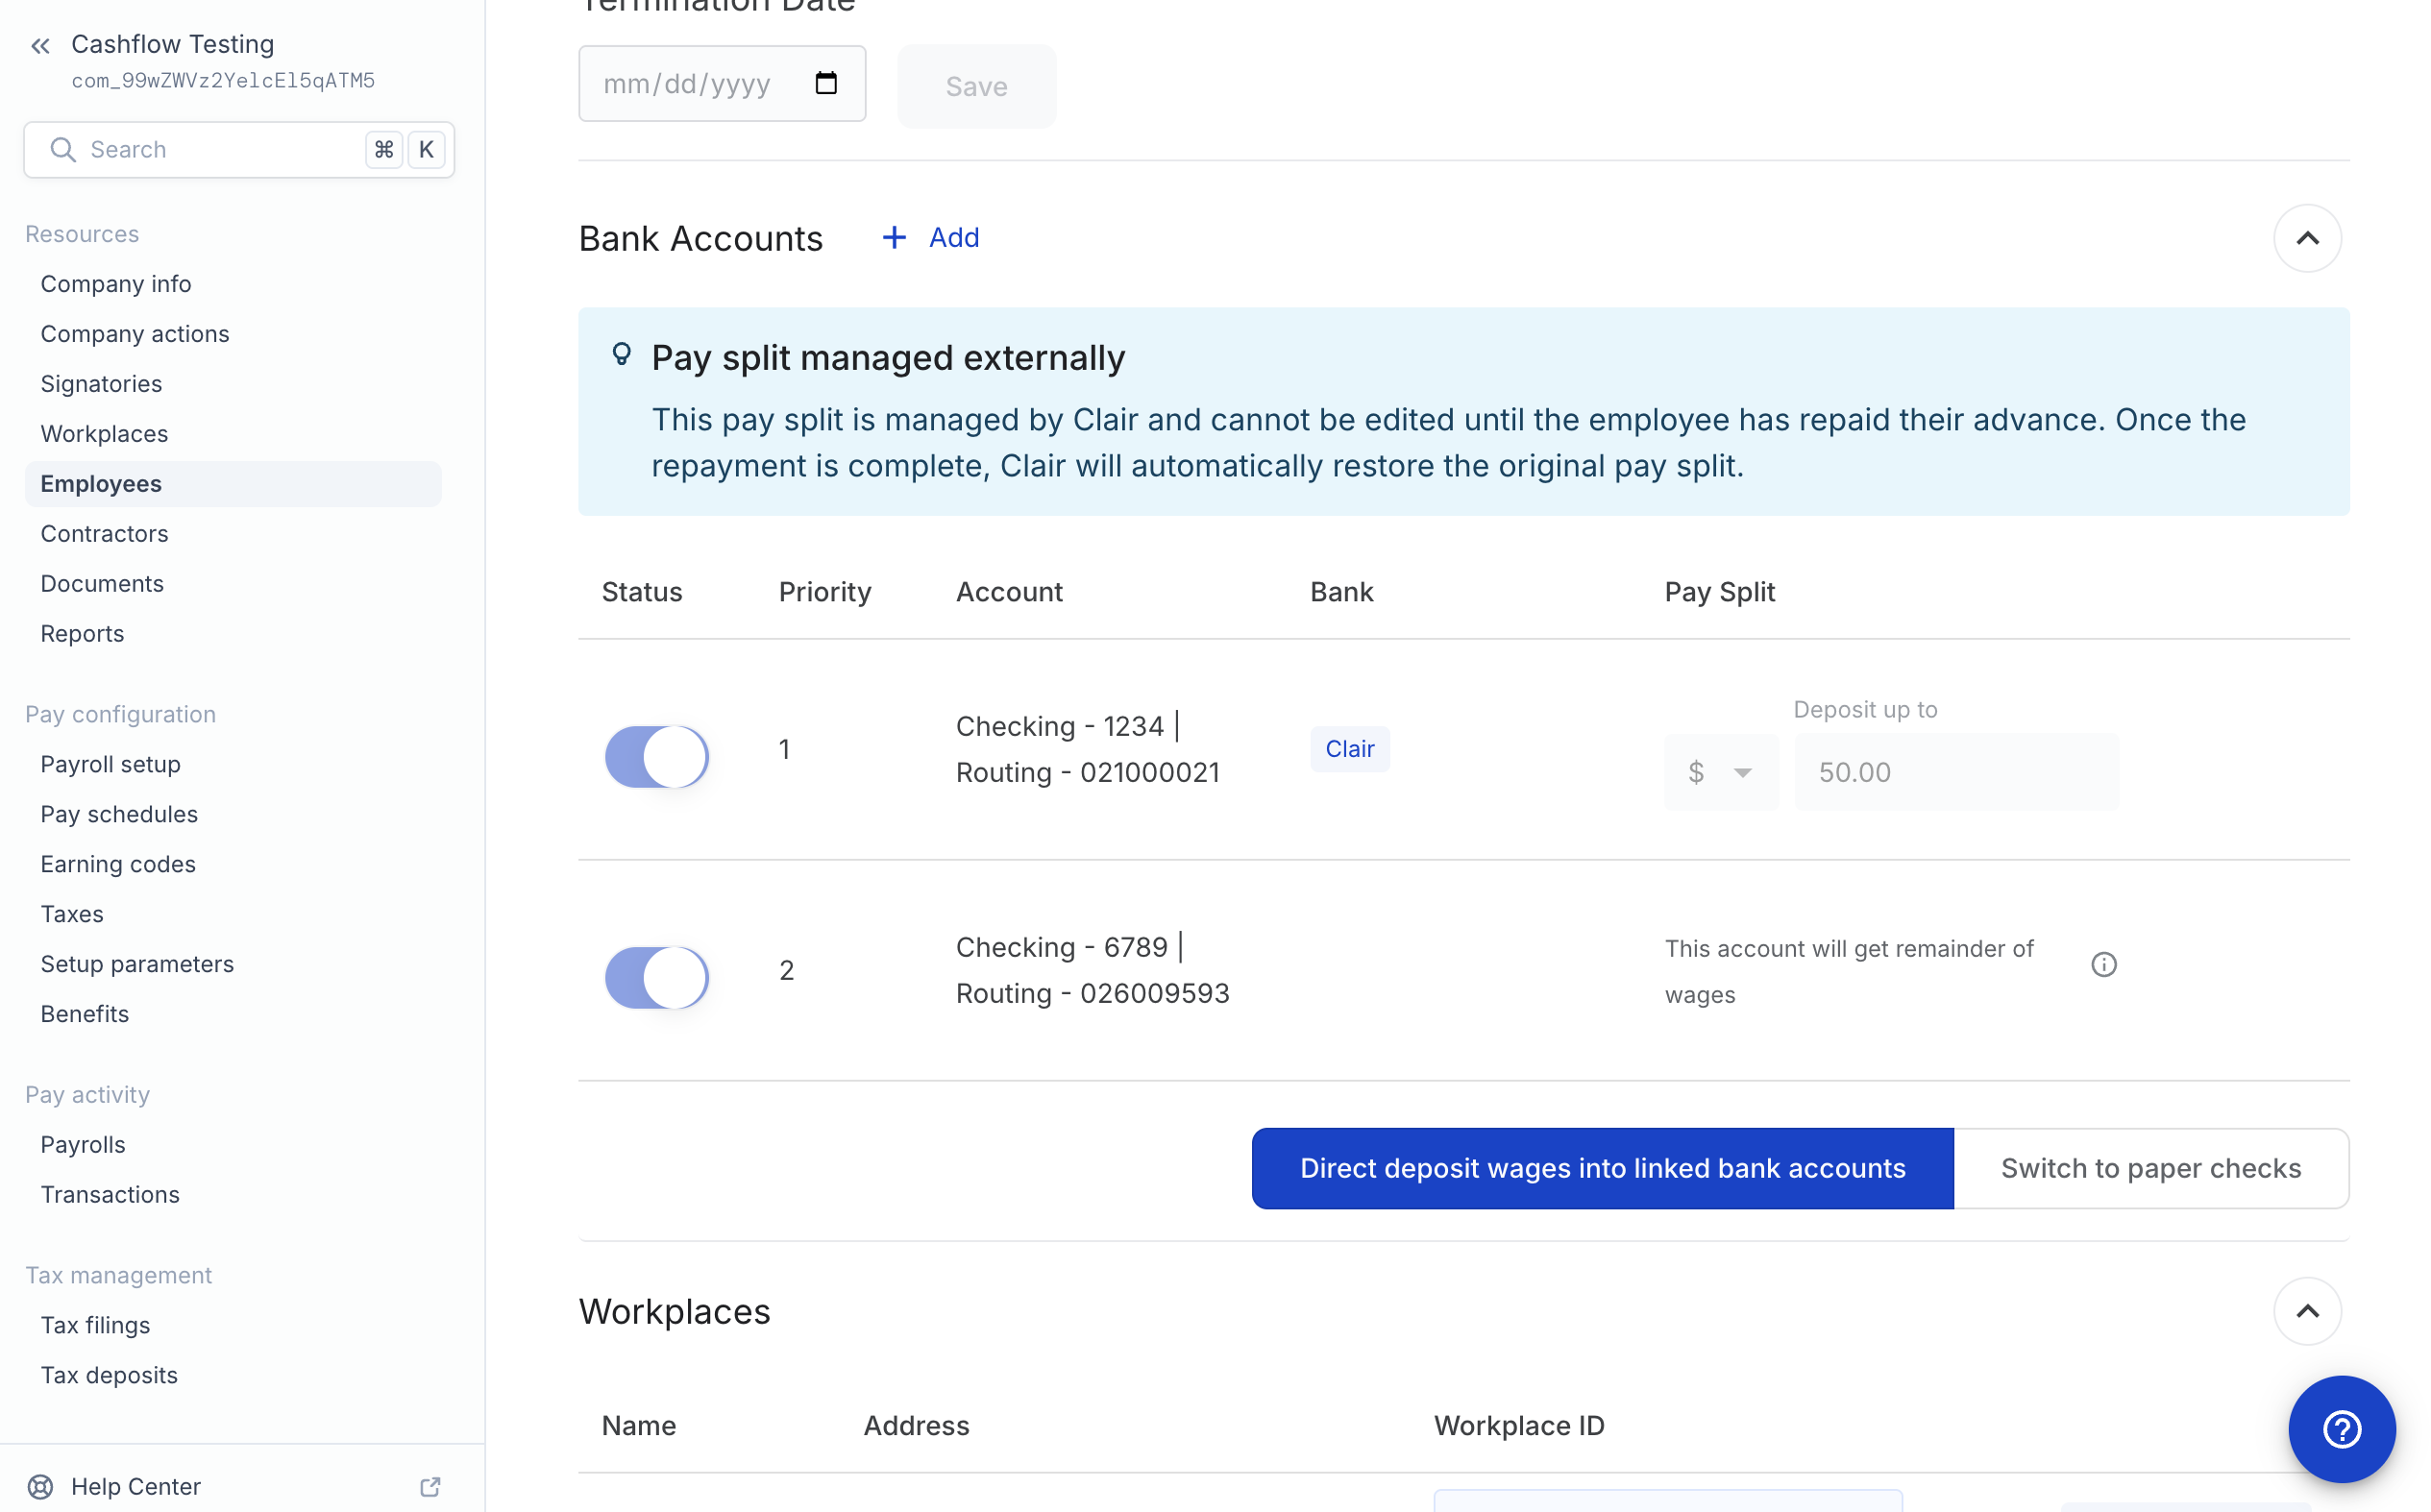
Console representation of a Clair-owned net pay split.
Net Pay Splits
When an employee takes an advance, Clair modifies the employee's net pay split configuration to route repayment:
- Advance taken: Clair creates a new default net pay split with the Pathward repayment account at priority 1 (highest priority) for the repayment amount. The employee's existing direct deposit accounts are preserved at lower priorities.
- Payroll runs: Check processes the payroll using the active net pay split. The repayment amount is routed to Pathward first; the remainder goes to the employee's other accounts.
- Advance repaid: Clair creates a new default net pay split that restores the employee's original direct deposit configuration, removing the Pathward account from the split.
Identifying Clair-Owned Net Pay Splits
Net pay splits created by Clair will have a source field set to int_WmZLVsXhpV55lkYjJh7r (the Clair integration partner ID). You can use this field to identify Clair-managed net pay splits in your UI and prevent employees or employers from modifying them while an advance is outstanding.
While an advance is outstanding:
- The employee's default net pay split is locked — neither you nor the employee can modify it through your platform.
- The repayment deduction will be visible on the employee's paystub as a separate direct deposit line item.
- If the employee's net pay is less than the repayment amount, the entire net pay is routed to Pathward, and Clair tracks the remaining balance for the next payroll cycle.
Direct Deposit Locking
While an employee has an outstanding advance, their direct deposit configuration is temporarily locked to protect the repayment. This means:
- Employees cannot modify their direct deposit settings through your platform while an advance is being repaid.
- Once the advance is fully repaid, the lock is released and the employee's original direct deposit configuration is restored.
UX RecommendationIf an employee attempts to modify their direct deposit while an advance is outstanding, display a message explaining that their settings are temporarily locked due to an active earned wage access advance, and that their original settings will be restored after repayment.
Lifecycle Summary
The table below summarizes what happens to key data objects at each stage of the Clair integration lifecycle:
| Stage | Company Auth | Employee Auth | Bank Accounts | Net Pay Split |
|---|---|---|---|---|
| Pre-Clair | Not authorized | Not registered | Employee's personal accounts only | Employee's original configuration |
| Company enabled | Integrated | Not registered | No change | No change |
| Employee activated | Integrated | INTEGRATED | No change | No change |
| Advance taken | Integrated | INTEGRATED | Pathward account added | Locked — Pathward at priority 1, repayment amount deducted |
| Advance repaid | Integrated | INTEGRATED | Pathward account remains (for future use) | Unlocked — original configuration restored |
| Company disconnected | Disconnected | DISCONNECTED | Pathward account remains but inactive | Original configuration (no Clair modifications) |
UX Recommendations
To ensure a smooth experience for employers and employees, we recommend the following messaging and UX patterns:
For Employers
- Activation messaging: When an employer enables Clair, explain that employees will have the option to access earned wages before payday at no cost to the employer.
- Paystub education: Let employers know that employees who take advances will see a repayment deduction on their paystubs. This is not an employer-initiated deduction — it is an automatic repayment for the employee's earned wage advance.
For Employees
- New bank account: If employees can view their bank accounts in your app, explain that the Pathward account is used for earned wage access repayment and is managed by Clair.
- Direct deposit locked: If an employee tries to change their direct deposit while an advance is outstanding, explain that their settings are temporarily locked and will be restored after repayment.
- Paystub deduction: On paystubs where a repayment occurs, consider adding a note or label explaining that the deduction is for earned wage access repayment.
Updated about 1 month ago